Oh, sweet mama, are you ready to give your bathroom a farmhouse makeover that’ll make Joanna Gaines proud? Grab your coffee (or wine, I won’t judge), and let’s chat about DIY farmhouse vanities that’ll transform your space without breaking the bank. As a mom of two tornado-like kiddos and one slobbery pup, I know firsthand the importance of a bathroom that’s both beautiful and battle-ready for daily life.
Listen, I’ve been where you are – staring at a sad, builder-grade vanity and dreaming of something with a little more character. But between soccer practice, PTA meetings, and trying to keep the house from looking like a category 5 hurricane hit, who has the time (or budget) for a full bathroom reno? That’s why I’m thrilled to share these 7 DIY farmhouse vanity projects that’ll give your bathroom that cozy, rustic charm without requiring a second mortgage. So put on your DIY hat, and let’s turn that bathroom from blah to beautiful!
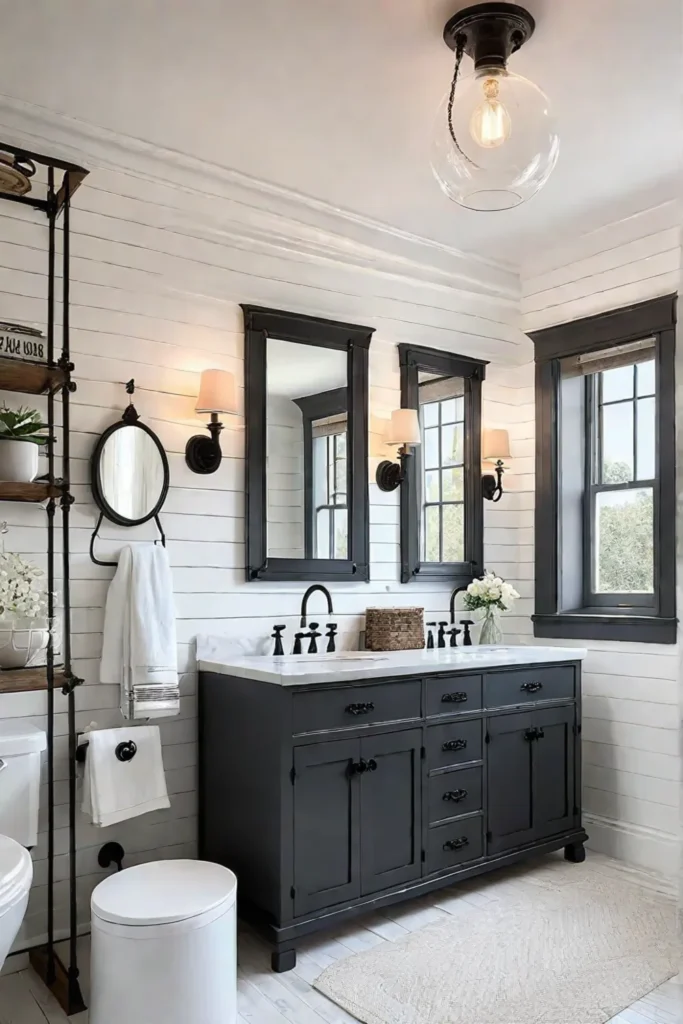
Reclaimed Wood Wonders
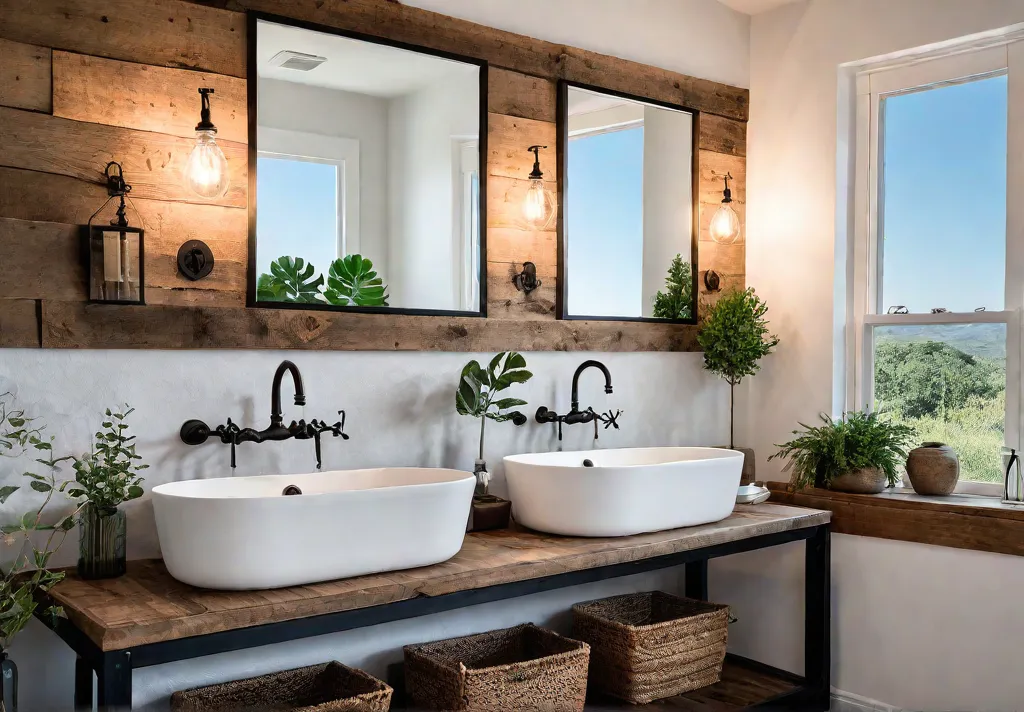
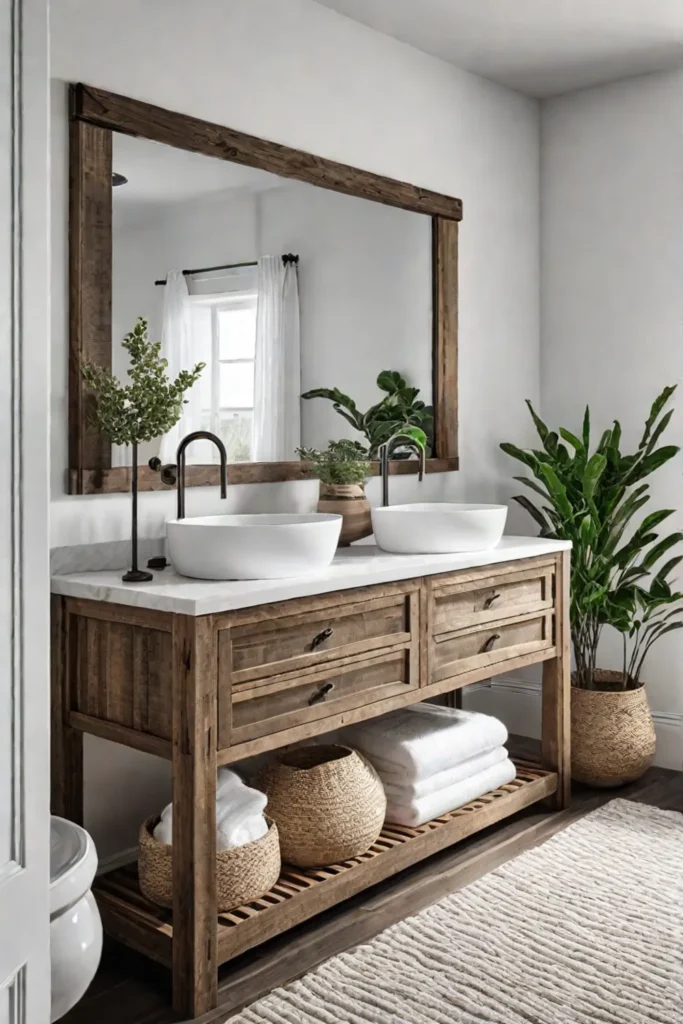
Let me tell you about my latest obsession: reclaimed wood vanities! They’re like a time machine for your bathroom, bringing in all that rustic charm and history. Plus, they’re eco-friendly, which makes my inner earth mama do a happy dance. Let’s dive into how we can turn some old wood into a stunning farmhouse vanity that’ll make your guests say, “Wow, where did you get that?”
Sourcing and Preparing Reclaimed Wood
First things first, we need to find that perfect piece of wood. I’ve had luck checking out local salvage yards, old barns (with permission, of course!), and even those free pallets behind the grocery store. Just last month, I scored an amazing weathered barn door from a farm down the road – the owner was thrilled it was going to be a good home!
But before you start sawing away, remember:
- Safety first! Always wear gloves and a mask when handling old wood.
- Check for nails, staples, or other metal bits that could damage your tools.
- Give that wood a good cleaning and treat it for pests. Trust me, you don’t want any unwelcome critters in your bathroom!
Pro tip: A mixture of vinegar and water works wonders for cleaning, and a borate solution can help keep the bugs at bay.
Vanity Ideas: From Simple to Statement Pieces
Now, let’s talk vanity styles. The beauty of reclaimed wood is its versatility. You can go super simple with a floating shelf vanity or go all out with a full cabinet – it’s up to you and your DIY skills!
For my guest bathroom, I went with a rustic-chic look:
- I used that old barn door as the vanity top.
- Added some hairpin legs for a modern touch (and to save my sanity – no cabinet building required!).
- Pair it with a white vessel sink for contrast.
The result? A stunning piece that looks like it could be in a fancy home decor magazine, but costs less than taking the kids to the movies (snacks included)!
When it comes to finishes, I’m a big fan of letting the natural beauty of the wood shine through. A clear, water-based polyurethane works great to protect the wood without hiding its character. But if you want to add a pop of color, milk paint is perfect for that farmhouse look.
Remember, folks, reclaimed wood can be hundreds of years old. That vanity you’re making could have started life as a tree when George Washington was president! How’s that for a conversation starter?
Pairing with Sinks and Countertops
Now, let’s talk about playing matchmaker with your reclaimed wood vanity and the perfect sink. I’ve found that vessel sinks or farmhouse sinks look dreamy with reclaimed wood. For countertops, you could:
- Use the reclaimed wood itself as the countertop (just seal it well!)
- Add a slab of marble or quartz for a touch of luxury
- Go for concrete if you’re feeling adventurous (and strong – that stuff is heavy!)
Whatever you choose, make sure it’s properly sealed to protect against water damage. Nobody wants a waterlogged vanity!
As we wrap up our reclaimed wood adventure, remember that the most important thing is to have fun with it. Each piece of wood has its own story, and now you get to add your chapter to it. And hey, if it doesn’t turn out perfect, just call it “rustic charm” and own it!
Next up, we’re going to explore how to breathe new life into old furniture with our “Upcycled Furniture Transformations” section. Get ready to turn Grandma’s old dresser into a bathroom showstopper!
Upcycled Furniture Transformations
Remember that old dresser collecting dust in your garage? Well, it’s time to dust it off and give it a new life as a stunning farmhouse vanity. Trust me, your bathroom (and wallet) will thank you!
Choosing the Right Furniture Piece
When I first started upcycling furniture, I was like a kid in a candy store at flea markets. But let me tell you, not every piece is vanity material. Here’s what to look for:
- Sturdy construction (it needs to hold up to daily use and water splashes)
- The right height (around 30-36 inches is ideal)
- Drawers or cabinet space for storage (because who doesn’t need more bathroom storage?)
Pro tip: Vintage sewing machine tables make amazing vanities! I turned one into a powder room vanity, and it’s always a conversation starter when guests come over.
Step-by-Step Conversion Guide
Alright, let’s roll up our sleeves and get to work! Here’s how to transform that old furniture piece into a farmhouse-chic vanity:
- Clean and prep the piece (goodbye, years of grime!)
- Remove any unnecessary hardware or drawers
- Cut an opening for the sink (this part always makes me nervous, but measure twice, cut once!)
- Sand and paint or stain as desired
- Apply a water-resistant sealant (trust me, you don’t want water damage ruining your hard work)
- Install the sink and plumbing (this might require a helping hand from your handy spouse or a plumber friend)
Now, I know what you’re thinking – “Sarah, what about the plumbing?” Don’t worry, I’ve got you covered! Typically, you’ll need to cut holes in the back of the piece for pipes and possibly remove or modify drawers to accommodate plumbing. It sounds scary, but it’s doable with some patience (and maybe a YouTube tutorial or two).
As for hardware, get creative! I’ve used old doorknobs as drawer pulls and repurposed vintage cup pulls for a charming touch. It’s all about adding that personal farmhouse flair!

The Magic of Upcycling
Let me tell you, there’s something magical about breathing new life into an old piece of furniture. Each upcycled vanity tells a story – like the time I transformed my grandmother’s old sideboard into a double vanity for our master bathroom. Now, every morning when I’m trying to wrangle the kids into brushing their teeth, I’m reminded of her.
Not only is upcycling budget-friendly (hello, more money for throw pillows!), but it’s also a sustainable choice. It’s a win-win for your wallet and Mother Earth!
Remember, with some creativity and elbow grease, almost any furniture piece can become a unique, farmhouse-style vanity. So next time you’re at a yard sale or scrolling through Facebook Marketplace, keep an eye out for your next vanity project!
As we move on to our next DIY adventure, let’s explore another farmhouse bathroom staple that’s both practical and pretty. Get ready to declutter and display with “The Charm of Open Shelving” – because who says storage can’t be stylish?
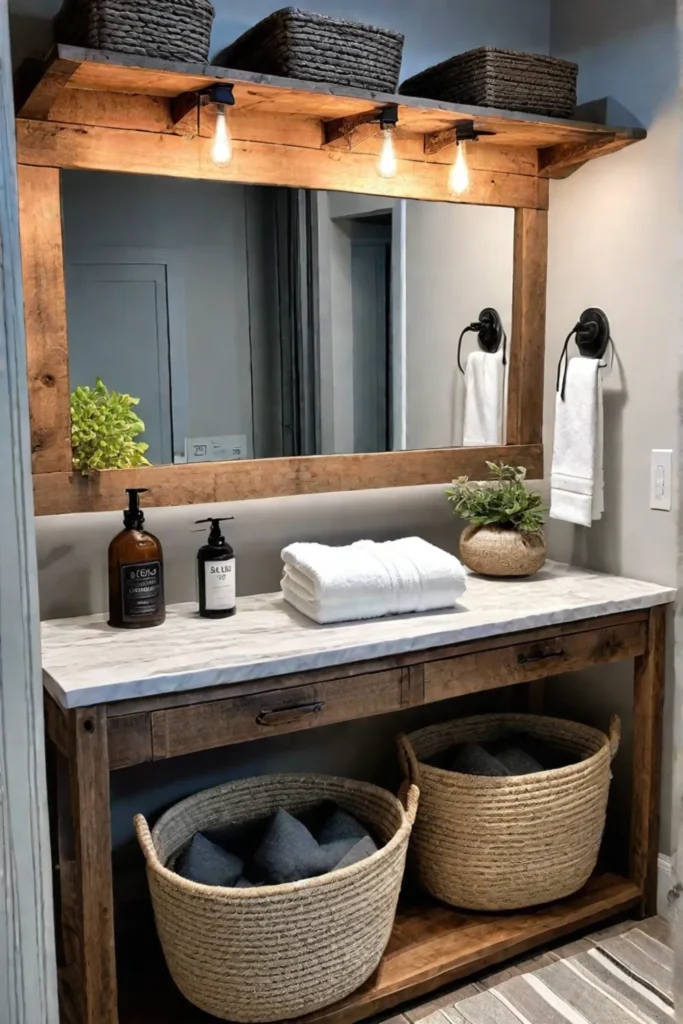
The Charm of Open Shelving
Let’s look at open shelving in a farmhouse bathroom! It’s like finding the perfect sippy cup that doesn’t leak – a total game-changer. When Mike and I were renovating our upstairs bathroom (while simultaneously potty training Tyler, mind you), we decided to go for open shelving, and it’s been a blessing in disguise.
Material Options: Rustic Wood to Industrial Pipe
There are so many ways to go with open shelving, and each one adds its special touch to your farmhouse vanity:
- Reclaimed wood: My personal favorite! We used old barn wood for a warm, rustic feel.
- Industrial pipe: Perfect for that modern farmhouse look.
- Floating shelves: Great for a cleaner, more minimalist vibe.
- Wrought iron brackets: Adds a touch of vintage charm.
Remember, different materials have different weight limits. Our wood shelves can hold quite a bit, but I wouldn’t recommend stacking your entire towel collection on them!

Styling Tips for Farmhouse Charm
Now, here’s where the fun begins! Styling your open shelves is like accessorizing your favorite outfit – it pulls the whole look together. Here are some ideas that have worked wonders in our bathroom:
- Use woven baskets for storing toiletries (and hiding the kids’ bath toys!)
- Display pretty glass jars filled with cotton balls or bath salts
- Roll up fluffy towels for a spa-like feel
- Add a small potted plant or two for a touch of greenery
Pro tip: Keep frequently used items on lower shelves for easy access. Trust me, when you’re trying to wrangle a squirmy 5-year-old into the bath, you’ll appreciate having everything within arm’s reach!
DIY Open Shelving Ideas
If you’re feeling crafty (and let’s face it, what mom isn’t these days?), here are some DIY open-shelving ideas that won’t break the bank:
- Ladder shelf: An old wooden ladder, sanded and painted, makes for unique vertical storage.
- Crate shelves: Mount wooden crates on the wall for a rustic, budget-friendly option.
- Repurposed dresser: Remove the drawers from an old dresser and use the openings as shelves.
Remember, functionality is key in a family bathroom. I learned the hard way that delicate knick-knacks and curious little hands don’t mix well!
Open shelving isn’t just practical – it can make your bathroom feel larger and more airy. It’s like decluttering your mind but for your bathroom! Plus, it gives you a chance to show off your prettiest toiletries and that adorable rubber ducky collection.
As we wrap up our chat about open shelving, let’s move on to the finishing touches. After all, what’s a farmhouse vanity without the perfect accessories? In our next section, “Accessorizing Your Farmhouse Vanity,” we’ll explore how to add those final details that will make your bathroom feel like a cozy country retreat. Trust me, it’s easier than getting spaghetti stains out of a white shirt!
Accessorizing Your Farmhouse Vanity
Let’s talk about the cherry on top of our farmhouse vanity sundae – the accessories! Do you know how a statement necklace can transform your favorite t-shirt and jeans combo? Well, the right hardware and fixtures can do the same for your vanity. So, let’s dive into making your farmhouse masterpiece shine!

Choosing the Right Hardware: From Vintage to Modern Farmhouse
When it comes to hardware, it’s all about the details. I remember standing in the hardware aisle for what felt like hours, debating between cup pulls and knobs while my kids turned the shopping cart into a NASCAR simulator. But trust me, it’s worth taking the time to get it right!
Here are some options to consider:
- Cup pulls: These bad boys scream farmhouse chic and are perfect for drawers.
- Bin pulls A more modern take that still fits the farmhouse vibe.
- Knobs: Simple, classic, and oh-so-versatile.
Pro tip: Mix and match! I love using cup pulls on drawers and knobs on cabinet doors for a curated look.
Now, where can you find these little gems without breaking the bank? Here are my go-to spots:
- Thrift stores and flea markets (bonus: it’s a fun family outing!)
- Online marketplaces like Etsy for unique, handcrafted options
- Home improvement stores (keep an eye out for sales!)
- Antique shops for authentic vintage pieces
Remember, you don’t need to spend a fortune to get that farmhouse feel. I once found a set of vintage glass knobs at a yard sale for $5 – score!
Faucets and Fixtures: Balancing Style and Functionality
Let’s face it, with kids, your faucet is going to see more action than a waterpark in July. So while we want it to look good, it needs to work hard too!

When choosing a faucet, consider these farmhouse-friendly finishes:
- Oil-rubbed bronze: Dark and dramatic
- Brushed nickel: Versatile and easy to clean
- Matte black: Modern farmhouse at its finest
- Polished brass: For a touch of vintage glam
But what are the pros and cons? Let’s break it down:
- Oil-rubbed bronze: Pros – hides water spots, and adds warmth. Cons – can be pricey, and may show wear over time.
- Brushed nickel: Pros – durable, matches most decor. Cons – can look a bit plain.
- Matte black: Pros – makes a statement, hides fingerprints. Cons – shows water spots, can be hard to match accessories.
- Polished brass: Pros – adds warmth, and vintage appeal. Cons – requires more cleaning, can look dated if not styled carefully.
In our house, we went with brushed nickel. It’s held up beautifully to years of sticky fingers and toothpaste splatters!
When it comes to style, bridge faucets, and gooseneck spouts are farmhouse favorites. But don’t forget about function – a pull-down sprayer can be a lifesaver when it’s time to wash little faces or clean up after a DIY disaster (ask me how I know).
Remember, these little details can make a big impact. It’s like accessorizing your favorite outfit – the right pieces can take it from “meh” to “marvelous”!
Now that we’ve dolled up our vanity with some farmhouse flair, let’s move on to creating a real showstopper. In the next section, we’ll dive into “Creating a Farmhouse Sink Focal Point” – because nothing says farmhouse quite like a big, beautiful sink!
Creating a Farmhouse Sink Focal Point
Alright, let’s talk about the star of our DIY farmhouse vanity show – the sink! I don’t know about you, but in our house, the bathroom sink sees more action than a muddy soccer field on game day. From scrubbing grass-stained knees to washing paint-covered hands (and paws – I’m looking at you, Buddy), a good sink is worth its weight in gold. So let’s dive into the world of farmhouse sinks and how to make them the showstopper in your bathroom makeover!

Types of Farmhouse Sinks: Apron-Front, Undermount, and More
When it comes to farmhouse sinks, there’s more variety than the snack options in my kids’ lunchboxes. Here are the main contenders:
- Apron-Front: The classic farmhouse look with that beautiful exposed front. Perfect for making a statement!
- Undermount: These tuck neatly under the countertop for a sleek, streamlined look.
- Drop-In: The easiest to install, these sit on top of the counter. Great for DIY newbies!
Each type has its charm, just like our kiddos. The apron front is like my Emma – bold and attention-grabbing. The undermount? That’s my Tyler – quietly stylish. And the drop-in? Well, that’s Buddy – easygoing and adaptable!
Integrating a Farmhouse Sink into Your DIY Vanity
Now, let’s talk about getting that sink to play nice with your DIY vanity. It’s kind of like arranging a playdate – you want everything to fit just right!
- Measure twice, cut once: Trust me, nothing’s worse than realizing your sink is too big for your vanity. Been there, done that, got the “oops” t-shirt.
- Consider your materials: Farmhouse sinks come in everything from fireclay to copper. Each has its pros and cons:
- Fireclay: Durable and easy to clean, but heavy. (Like trying to lift both kids at once!)
- Porcelain: Classic look, but can chip. (Much like my favorite mug after it met the kitchen floor.)
- Copper: Gorgeous patina over time, but requires more care. (Think of it as the high-maintenance friend of sinks.)
- Think about plumbing: Some farmhouse sinks require specific plumbing setups. It’s like trying to fit all the kids’ activities into one weekend – sometimes you need to get creative!
- Match your style: A rustic copper sink might look out of place with a sleek modern vanity. It’s all about finding that perfect balance, just like coordinating the family’s outfits for picture day (minus the arguments).

Remember, a farmhouse sink is like the family dog in a Christmas photo – it’s going to be a focal point whether you plan for it or not. So make sure it’s one you love!
Pro tip: If you’re worried about water splashing (because let’s face it, kids and water are a recipe for impromptu pool parties), consider a deeper basin. It’s been a game-changer in our house!
As we wrap up our sink selection, remember that the perfect farmhouse sink can turn your DIY vanity from “Oh, that’s nice” to “WOW, did you make that yourself?” It’s all about finding that perfect balance of style and function – kind of like juggling soccer practice, piano lessons, and still managing to get dinner on the table.
Now that we’ve got our sinks sorted, it’s time to put the finishing touches on our farmhouse vanity masterpieces. In the next section, we’ll explore the world of paint and stain techniques to make your vanity pop. Get ready to unleash your inner artist – smocks optional, but highly recommended!
Finishing Touches: Paint and Stain Techniques
Alright, we’ve built our farmhouse vanities, but now it’s time for the fun part – making them look like they’ve been around since Grandma’s Day! As a mom who’s constantly battling crayon marks and sticky fingerprints, I’ve learned a thing or two about durable finishes. Let’s dive into some paint and stain techniques that’ll give your vanity that perfect rustic charm while standing up to daily life with kiddos.
Distressed Paint Techniques for a Timeworn Look
Remember when Emma “helped” paint the kitchen chairs and it looked like a unicorn exploded? Well, sometimes that worn-in look is exactly what we’re going for! Here’s how to achieve a chippy paint finish without the toddler’s assistance:
- Start with a base coat of paint (I love using chalk paint for its matte finish).
- Once dry, apply petroleum jelly to areas where you want the paint to chip away.
- Paint over everything with your top coat color.
- After it’s completely dry, use a putty knife to scrape away the paint where you applied the jelly.

Voila! Instant history without waiting a century. Just be sure to seal it all with a clear topcoat to prevent any actual chipping in your busy bathroom.
Staining and Sealing for Natural Beauty
For those of you blessed with patience (unlike my dear Tyler, who asks “Is it done yet?” approximately 47 times during any project), staining can bring out gorgeous natural wood tones. Here’s my fool-proof method:
- Sand your vanity smooth – this is key for an even finish!
- Apply a pre-stain wood conditioner to prevent blotchiness.
- Use a foam brush to apply your chosen stain, working in the direction of the grain.
- Wipe off excess stains with a clean cloth after a few minutes.
- Let it dry completely, then seal with polyurethane for durability.
Pro tip: Test your stain on a scrap piece first. Trust me, it’s better than realizing halfway through that the color reminds you of Great Aunt Mildred’s ancient coffee table!
Safety First, Folks!
Before you go wild with paint and stain, remember that we’re dealing with some potent stuff here. Always work in a well-ventilated area (I learned this the hard way after staining our deck and feeling loopy for hours). Wear gloves, a mask, and protective eyewear. And for the love of all things holy, keep curious little hands away from your supplies!
Choosing the Right Products
When it comes to bathroom vanities, moisture-resistant paints and stains are your best friends. Look for products specifically designed for high-humidity areas. And if you’re like me and constantly wiping down surfaces (how do kids manage to get toothpaste EVERYWHERE?), opt for finishes that can handle frequent cleaning.

Remember, the right finish can take your vanity from “Oh, that’s nice” to “WOW, where did you get that?!” Don’t be afraid to experiment with different techniques – you might surprise yourself with your hidden talents. And if all else fails, there’s always the option of convincing your kids that the lumpy paint job was intentional. They’ll believe anything, right?
Now that we’ve got our vanities looking perfectly imperfect, it’s time to put all these ideas into action. In our next section, “DIY Farmhouse Vanity Project Plans,” we’ll walk through seven different vanity designs that’ll have you itching to grab your power tools. Get ready to transform your bathroom from blah to farmhouse fabulous!
DIY Farmhouse Vanity Project Plans (7 Total)
Alright, fellow DIY warriors, it’s time to roll up our sleeves and dive into some seriously awesome farmhouse vanity projects! As a mom who’s survived countless craft disasters (hello, glitter explosion of 2018), I’m here to guide you through seven vanity makeovers that’ll transform your bathroom without breaking the bank. So grab your coffee, tell the kids to play nicely for a few hours (a girl can dream, right?), and let’s get started!
Project 1: Simple Reclaimed Wood Console Vanity (Beginner)
This project is perfect for those of you who, like me, are still mastering the art of hanging a picture frame straight.
Materials:
- Reclaimed wood boards
- 2×4 lumber for frame
- Plumbing pipe for legs
- Vessel sink
- Faucet
Tools:
- Saw
- Drill
- Sander
- Screwdriver
Estimated time: 4-6 hours

Step-by-step instructions:
- Cut the reclaimed wood to size for the top
- Build a simple frame with 2x4s
- Attach the reclaimed wood to the frame
- Install plumbing pipe legs
- Cut a hole for the vessel sink
- Sand and finish the wood
- Install the sink and faucet
Pro tip: Check your local salvage yard for unique reclaimed wood pieces. You might just score some beautiful barn wood with a story to tell!
Project 2: Upcycled Dresser Vanity with Open Shelving (Intermediate)
Remember that old dresser gathering dust in the garage? Time to give it new life!
Materials:
- Old dresser
- Wood for open shelves
- Paint or stain
- Drop-in sink
- Faucet
Tools:
- Jigsaw
- Drill
- Sander
- Paintbrush
Estimated time: 6-8 hours

Step-by-step instructions:
- Remove drawers and sand the dresser
- Cut a hole in the top for the sink
- Paint or stain the dresser
- Install the sink and faucet
- Build and attach open shelves on one side
Fun fact: Upcycling furniture like this saves about 2.5 cubic yards of landfill space per piece. That’s a win for both your bathroom and Mother Earth!
Project 3: Farmhouse Sink Base with Shaker Doors (Intermediate)
This project will give you that classic farmhouse look that’s all over Pinterest (admit it, we’re all addicted).
Materials:
- Plywood for cabinet box
- 1×2 and 1×3 boards for face frame and doors
- Farmhouse sink
- Faucet
- Hinges and door pulls
Tools:
- Table saw
- Drill
- Kreg jig
- Paintbrush
Estimated time: 8-10 hours

Step-by-step instructions:
- Build the cabinet box with plywood
- Construct and attach the face frame
- Build shaker-style doors
- Paint or stain all components
- Install the sink and faucet
- Attach doors and hardware
Handy tip: To get that perfect distressed look, lightly sand the edges of your painted vanity. It’s like those pre-ripped jeans the kids are wearing but for your bathroom!
Project 4: Live Edge Wood Vanity with Waterfall Countertop (Advanced)
Fair warning: this project might make you feel like a master craftsman (or craftswoman). It’s a showstopper!
Materials:
- Live edge wood slab
- Steel base
- Vessel sink
- Faucet
Tools:
- Router
- Angle grinder
- Welding equipment
- Epoxy resin
Estimated time: 12-15 hours

Step-by-step instructions:
- Cut and shape the live edge slab
- Create a waterfall edge with a 45-degree miter cut
- Weld the steel base
- Fill any cracks with epoxy resin
- Sand and finish the wood
- Attach the wood to the base
- Install the sink and faucet
Did you know? Live edge furniture dates back to the 1940s when George Nakashima popularized the style. Now you can impress your guests with both your DIY skills and your design history knowledge!
Project 5: Double Vanity with Shiplap Backsplash (Advanced)
For those of you blessed with a larger bathroom (and probably more than one kid fighting over sink space).
Materials:
- Plywood for cabinet boxes
- 1×6 boards for shiplap
- Countertop material
- Two sinks and faucets
- The drawer slides and pulls
Tools:
- Table saw
- Miter saw
- Nail gun
- Drill
Estimated time: 15-20 hours

Step-by-step instructions:
- Build two cabinet boxes
- Construct drawer boxes and install slides
- Create and attach face frames
- Install shiplap backsplash
- Attach countertop
- Install sinks and faucets
- Add drawer fronts and hardware
Practical advice: Measure your space carefully and plan for plumbing before you start. Trust me, nothing’s worse than building the perfect vanity only to realize it doesn’t fit!
Project 6: Industrial Pipe Vanity with Concrete Top (Advanced)
Get ready to channel your inner Joanna Gaines with this industrial-chic vanity.
Materials:
- Black iron pipes and fittings
- Wood for shelves
- Concrete mix
- Vessel sink
- Faucet
Tools:
- Pipe cutter
- Drill
- Concrete forms
- Sander
Estimated time: 10-12 hours

Step-by-step instructions:
- Cut and assemble pipes for the frame
- Create a concrete form for the top
- Mix and pour concrete
- Cut and finish wood shelves
- Assemble the vanity
- Install sink and faucet
Fun fact: Concrete has been used in construction since ancient Roman times. Now you’re part of a long tradition!
Project 7: Custom-Sized Vanity with Built-in Storage (Advanced)
This project is for those odd-sized spaces that just won’t fit a standard vanity. I’m looking at you, 1950s bathroom!
Materials:
- Plywood for cabinet and drawers
- Solid wood for the face frame
- Countertop material
- Sink and faucet
- The drawer slides and pulls
Tools:
- Table saw
- Router
- Kreg jig
- Drill
Estimated time: 18-24 hours

Step-by-step instructions:
- Measure your space and create a detailed plan
- Cut plywood for cabinet boxes and drawers
- Build and install drawer boxes
- Construct and attach a face frame
- Create custom doors if needed
- Install countertop, sink, and faucet
- Add drawer fronts and hardware
Pro tip: Make a cardboard mock-up first to ensure your design fits perfectly. It’s like trying on clothes before you buy them but for your vanity!
There you have it, my DIY-loving friends! Seven farmhouse vanity projects to suit every skill level and style. Remember, perfection is overrated – it’s the little imperfections that give your project character (at least that’s what I tell myself when my projects go a bit sideways). Now, go forth and create the farmhouse bathroom of your dreams!
As we wrap up these project plans, let’s take a moment to reflect on the journey we’ve embarked on. From simple console vanities to custom storage solutions, we’ve covered a lot of ground. But before you dash off to your local hardware store (or send your spouse on a supply run), let’s recap the key takeaways and final thoughts in our conclusion.
Final Thoughts
Well, there you have it, my DIY-loving friends! Seven fabulous farmhouse vanity projects that’ll transform your bathroom faster than you can say “shiplap.” Remember, perfection is overrated – it’s those little imperfections that give your project character and make it uniquely yours. So don’t stress if your lines aren’t perfectly straight or your paint job has a few extra brush strokes. That’s what we call “rustic charm” in the farmhouse world!

As you embark on your vanity makeover journey, keep in mind that the best projects are the ones that work for your family. Maybe that means adding extra storage for all those bath toys or choosing a finish that can withstand toothpaste splatters and wet dog shakes. Whatever you choose, I hope these ideas have inspired you to roll up your sleeves and create a bathroom that’s both beautiful and functional. Now, go forth and conquer that DIY project – and don’t forget to share your before-and-after pics! Who knows, you might just inspire another mama to pick up that power tool and start her farmhouse transformation. Happy DIYing!